Part I of this article, explains how to create a brokered web service in XI 3.0. In this part, I will describe how to consume this web service in a Web Dynpro Application.
Scenario:
- User requests Customer Details via a Web browser
- Data is sent through WebAS to XI using a SOAP adapter
- The message is then synchronously sent to SAP R/3 system via RFC adapter, and a BAPI call is executed to get the Customer details
- The BAPI response is sent to the WebAS to fulfil the user request
In Part I of this article I described how to define web services in XI. In this part, I will focus on using the generated WSDL file to expose the web service using a Web Dynpro application
Prerequisites:
- Good knowledge of XI 3.0 concepts
- Basic knowledge of Web Dynpro Applications
Steps:
- Create a Web Service Model by importing the XI generated WSDL file
- Design a Web Dynpro Application
- Deploy the application on WebAS
Create a Web Service Model
1. Create a new Web Dynpro project in NetWeaver Developer Studio. Expand Web Dynpro node and right click on Models to Create Model
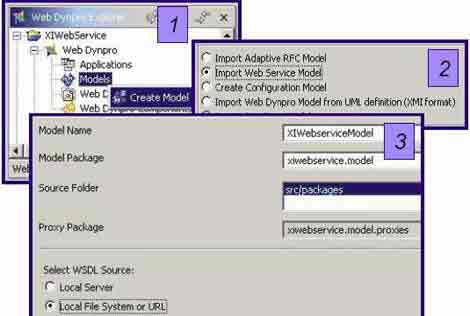
2. Choose to Import Web Service Model and click Next >
3. Specify a model name and a package. Select WSDL source as Local File System or URL since our WSDL file is saved on the local desktop
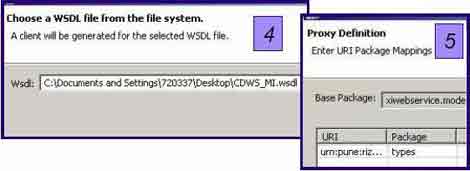
4. Specify the source of WSDL File and click Next >
5. Click Finish to close the Wizard
Views and Navigation Schema
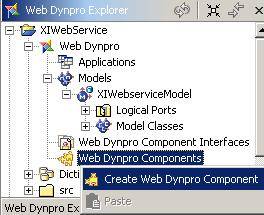
1. Create a Web Dynpro Component
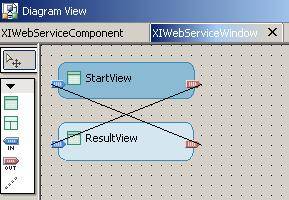
2. Create two views: StartView and ResultView. You need to embed these views in a window. For this, you can use the context menu for the window created under the component.
3. Create inbound and outbound Fireplugs using the context menu for both the embedded vievs.
4. Specify the navigation schema using the Create a navigation link button on the left hand side toolbar as shown below:
Add the Web Service Model
1. Open the component by double-clicking on it
2. In the Used Models area, right-click and choose Add Existing Model. Select the Web Service model imported previously.
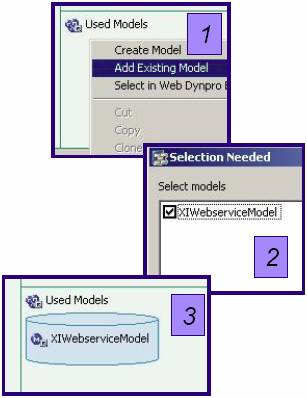
3. The model now appears in the Used Models area.
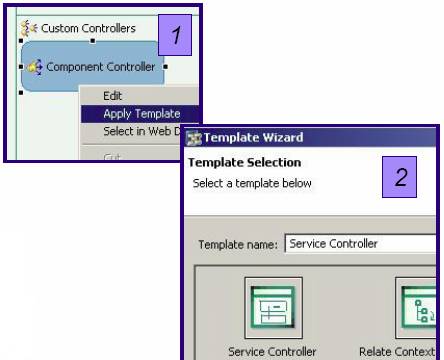
Define Model Binding
1. Right click on Component Controller and choose Apply Template
2. Select the Service Controller and click Next >
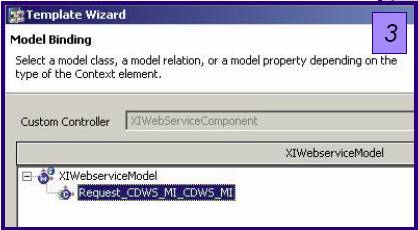
3. Select the Model class for the Model Binding and click Next >
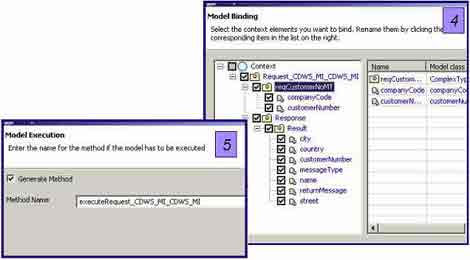
4. Select the Context Elements you want to bind and click Next >
5. Accept the proposed method name and click Finish to generate the method
Define Context Mapping
1. Open the component by double-clicking on it. In the left hand side toolbar, choose Create a data link. Join the StartView and Component Controller. Drag reqCustomerNoMT folder from right hand side to the left hand side. Another wizard window appears.
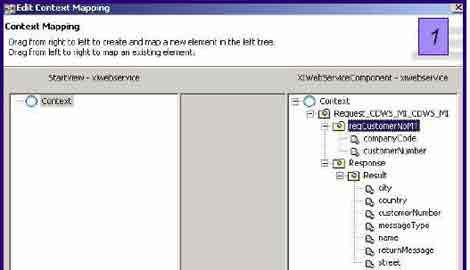
2. Select the fields for context mapping. Click OK and then click Finish.

3. Similarly join ResultView and Component Controller using fields from Response folder
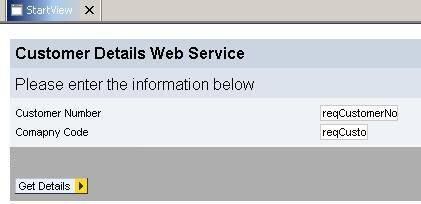
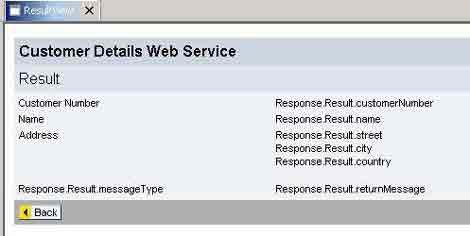
User Interface Design
Create the necessary User Interface elements for both the Request and Response Messages and the Action Methods. An example is shown below:
Note:
XI does not accept unauthenticated requests. Hence, you have to pass the logon credentials along with the request. For this add following lines of code in the executeRequest_CDWS_MI_CDWS_MI( ) method implementation of the Component Controller:
wdContext.currentRequest_CDWS_MI_CDWS_MIElement().modelObject()

._setUser(“username");

wdContext.currentRequest_CDWS_MI_CDWS_MIElement().modelObject()

._setPassword(“password");
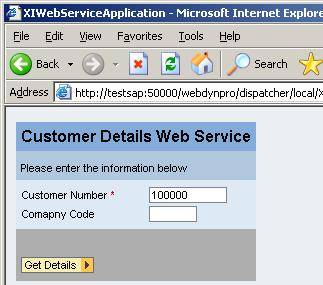
Create and Run the Application
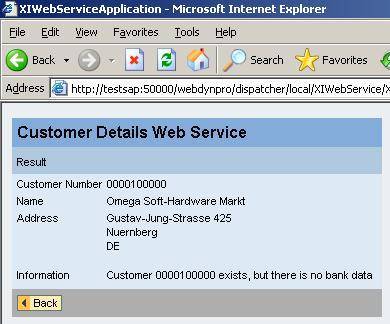
Finally, create an application for the component, build the project and deploy the application on WebAS. Sample execution of the application is shown in the figure below:
There are various ways of consuming the web services created via XI. I have just described one of the ways. In the scenario discussed here, XI acts as an intermediary (as a broker) between the Web Application and SAP R/3. Such web services are called as Brokered Web Services.